Overview

An L2 network is a layer 2 broadcast domain used for layer 2 isolation. Generally, L2 networks are identified by names of devices on the physical network.
  • VLAN, VXLAN, or SDN can be used as an L2 network and can provide layer 2 isolation.
  • An L2 network is used to provide layer 2 isolation for an L3 network, as shown in L2 Network.
Figure 1. L2 Network


Four Major Types of L2 Network

An L2 network supports mainly four types.
  1. L2NoVlanNetwork
    L2NoVlanNetwork indicates that VLAN settings are not used for connecting the corresponding host.
    • If you set VLAN for a switch port, make sure that the switch port is in Access mode.
    • If you do not set VLAN for the switch port, do not make any operation.
    • If you create an L2 network, note that a bridge will be created according to the network device that you have entered.
  2. L2VlanNetwork
    L2VlanNetwork indicates that VLAN settings are used for connecting the corresponding host.
    • The switch port connected by the host must be in Trunk mode.
    • The virtual LAN can be divided logically. Notice that it can support 1-4094 subnets.
    • If you create an L2 network, notice that a VLAN device will be created according to the network device that you have entered. In addition, a bridge will be created according to the VLAN device.
  3. VxlanNetwork
    VxlanNetwork indicates that the VXLAN network is created by using the VNI specialized by VxlanNetworkPool of the Software SDN type.
    • VxlanNetwork is created according to VxlanNetworkPool of the Software SDN type.
    • Each VxlanNetwork corresponds to a VNI specialized by VxlanNetworkPool of the Software SDN type.
    • VxlanNetwork can be used for creating an L3 network.
  4. HardwareVxlanNetwork
    HardwareVxlanNetwork indicates that the VXLAN network is created by using the VNI specialized by VxlanNetworkPool of the Hardware SDN type.
    • HardwareVxlanNetwork is created according to VxlanNetworkPool of the Hardware SDN type.
    • Each HardwareVxlanNetwork corresponds to a VNI specialized by VxlanNetworkPool of the Hardware SDN type.
    • HardwareVxlanNetwork can be used for creating an L3 network.
Note:
  • When you add NoVlanNetWork or VlanNetwork, enter the NIC name.
  • In CentOS 7, the NIC name in the ethX format will be changed after the system reboots. In addition, the NIC sequence will also be randomly changed. We recommend that you change the NIC name of each compute node (especially for VM instances with multiple NICs) to a non-ethX format, such as em01.

Relationship Between L2 Network and Cluster/L3 Network/VM Instance

The relationship between L2 network and cluster/L3 network/VM instance is as follows:
  • If you attached an L2 network to a cluster whereas the L2 network was not attached to a host, you could not add the host to the cluster.
  • If you did not attach an L2 network to a cluster and the L2 network was not attached to a host, you could not attach the L2 network to the cluster.
  • If you attached an L2 network to a host whereas the corresponding L2 network devices were inconsistently connected to other hosts in a cluster, note that the VM instance IP that you created would not work normally.
  • You can use one L2 network to create multiple child L3 networks. If you select the HarewareVxlanNetwork L2 network to create a private network, you can only create a flat network and corresponding network services. vRouter network cannot be created by using the HarewareVxlanNetwork L2 network.
  • If you delete an L2 network, notice that the corresponding L3 network will also be deleted, and that the VM NIC in the L3 network will be deleted as well.
  • If you delete an L2 network, you will also delete the vRouter, VPC vRouter, and vRouter offering in the L2 network.
  • If you delete the corresponding L2 network of a public network, notice that all network services of the corresponding router will be deleted, including the vRouter, VPC vRouter, vRouter offering, virtual IP, elastic IP, port forwarding, load balancing, IPsec tunnel, and Netflow.
  • You can create multiple VxlanNetworks by using a VXLAN Pool of the Software SDN type. These VxlanNetworks can be applied to the flat network, vRouter network, or VPC network respectively.
  • VM instances in VxlanNetwork cannot be accessed through the Internet. To access these VM instances through the Internet, use an elastic IP or port forwarding.
  • You can also create multiple HardwareVxlanNetworks by using a VXLAN Pool of the Hardware SDN type. These HardwareVxlanNetworks can currently be applied to flat networks.

Inventory

Properties

Name Description Optional Valid Value Starting Version
uuid The UUID. For more information, see Resource Property. 0.6
name The name. For more information, see Resource Property. 0.6
description The description. For more information, see Resource Property. Yes 0.6
zoneUuid The UUID of the parent zone. For more information, see Zone. 0.6
physicalInterface The physical interface. For more information, see Physical Interface. 0.6
type The L2 network type.
  • L2NoVlanNetwork
  • L2VlanNetwork
  • VxlanNetworkPool
  • VxlanNetwork
0.6
attachedClusterUuids The clusters to which the L2 network is attached. For more information, see Attach Cluster. 0.6
createDate The creation date. For more information, see Resource Property. 0.6
lastOpDate The last operation date. For more information, see Resource Property. 0.6

Sample

{
    "inventories": [
        {
            "attachedClusterUuids": [
                "553c2fd2a67b4b89a6240541959b861f"
            ],
            "createDate": "Mar 10, 2018 2:35:14 PM",
            "description": "",
            "lastOpDate": "Mar 10, 2018 2:35:14 PM",
            "name": "L2Network-1",
            "physicalInterface": "eth0",
            "type": "L2NoVlanNetwork",
            "uuid": "dde9685e3ba944bea8c643fe64200750",
            "zoneUuid": "fa18454182eb41749797f824c00cfccf"
        }
    ],
    "success": true
}

Physical Interface

A physical interface is a string, such as eth0. The string contains information about the related L2 network in the data center. Normally, different types of the L2 network and different types of hypervisors have different physical interfaces. This is because the hypervisors use their own notations to describe L2 networks, and an L2 network can be simultaneously attached to multiple clusters of different hypervisor types.

Assume that a data center has an L2 network (L2 Network A). L2 Network A can be used across two clusters: the KVM cluster and the VMware cluster. In the KVM cluster, L2 Network A is realized by an Ethernet device in Linux operating system. In this example, assume that each KVM instance can connect to L2 Network A by using eth0. In the VMware cluster, L2 Network A is realized by vSwitch. In this example, assume that the VMware cluster can connect to L2 Network A by using vswitch0. In this regard, the entire topology can be shown as L2 Network Topology.
Figure 1. L2 Network Topology


Many operations seemingly applied to zones and clusters are actually delegated to hosts. Here, when L2 Network A is attached to the KVM cluster and the VMware cluster, ZStack Cloud must understand how the hypervisor in these clusters use the notations to describe the L2 network. That is, eth0 on the KVM host represents the L2 network, while vswitch0 on the VMware host also represents the L2 network. Therefore, the name of a physical interface can also reflect different hypervisors.

Attach Cluster

Attaching a cluster is to associate an L2 network with the sibling clusters in the same zone. Attaching a cluster provides a flexible solution to maintain the relation between hosts and L2 networks in a data center, as shown in Attach Cluster.
Figure 2. Attach Cluster


Assume that the network topology in your data center is as the above. The eth0s of the hosts in all clusters are on the same L2 network (L2 Network1), while eth1s of the hosts in Cluster1 and Cluster3 are on another L2 network (L2 Network2). To describe this topology in ZStack Cloud, you can attach L2 Network1 to all the three clusters, and attach only L2 Network2 to Cluster1 and Cluster3.

Several months later, due to some business needs, you can make some modifications to the network topology. You need to unplug the Ethernet cables connected by eth1s of the hosts in Cluster3 from the rack switch. Then, you will no longer connect Cluster3 with L2 Network2. You can detach L2 Network2 from Cluster3, and notify ZStack Cloud of the network topology change, as shown in Modify the Attached Cluster.
Figure 3. Modify the Attached Cluster


L2NoVlanNetwork

L2NoVlanNetwork is a basic type of L2 network. NoVlan in L2NoVlanNetwork does not mean that you cannot use the VLAN technology. Contrarily, it simply means that ZStack Cloud will not take the initiative to use VLAN to create a layer 2 broadcast domain. The following two topologies can help you better understand the L2NoVlanNetwork.

As shown in Configuration of L2NoVlanNetwork 1.

Figure 4. Configuration of L2NoVlanNetwork 1


In the figure above, both Port 5 and Port 12 in L2 Switch are untagged with VLAN 10 (access port with VLAN 10 in Cisco term), and connect to eth0 on Host1 and Host2 respectively. This is an effective configuration for L2NoVlanNetwork. You can use physicalInterface = eth0 to create an L2NoVlanNetwork, and attach it to Cluster.

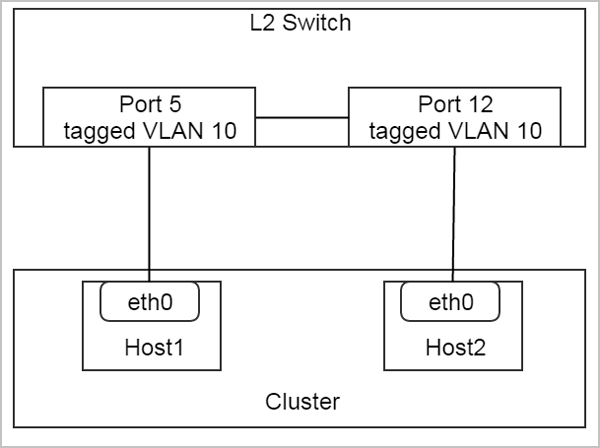
As shown in Configuration of L2NoVlanNetwork 2.

Figure 5. Configuration of L2NoVlanNetwork 2


In the figure above, both Port 5 and Port 12 in L2 Switch are tagged with VLAN 10 (trunk port with VLAN 10 in Cisco term), and connect to eth0.10 (a pre-created VLAN device) on Host1 and Host2 respectively. This is also an effective configuration for L2NoVlanNetwork. You can use physicalInterface = eth0.10 to create an L2NoVlanNetwork, and attach it to Cluster.

That is, one L2NoVlanNetwork corresponds to a pre-created layer 2 broadcast domain. ZStack Cloud will not create any new broadcast domain for an L2NoVlanNetwork.

L2NoVlanNetwork KVM Specifications

When you attach an L2NoVlanNetwork to a KVM cluster, the physicalInterface must be the Ethernet device name in a Linux operating system, such as eth0, eth0.10, and em1. When you create a bridge in ZStack Cloud by running the brctl command, note that the physicalInterface will be used as the device name. The pseudo codes are as follows:
Assuming physicalInterface = eth0

brctl create br_eth0
brctl addif br_eth0 eth0
L2NoVlanNetwork Inventory Sample
{
    "inventories": [
        {
            "attachedClusterUuids": [
                "967a353c2893409dab9312cf3033a98c"
            ],
            "createDate": "Oct 30, 2017 1:53:20 PM",
            "description": "",
            "lastOpDate": "Oct 30, 2017 1:53:20 PM",
            "name": "L2NoVlan",
            "physicalInterface": "eth0",
            "type": "L2NoVlanNetwork",
            "uuid": "5f0391e0c7ed45dba5ee5ed9c638f146",
            "zoneUuid": "e59b71e99d8a4ea1952b578388b8cd1d"
        }
    ],
    "success": true
}

L2VlanNetwork

L2VlanNetwork is an L2 network that ZStack Cloud will actively create a layer 2 broadcast domain by using VLAN. According to the different hypervisor types in a cluster, ZStack Cloud will use different methods to create layer 2 broadcast domains for L2 networks. Compared with l2Network inventory, an L2VlanNetwork has the following additional property.
Name Description Optional Valid Value Starting Version
vlan The VLAN ID for creating a layer 2 broadcast domain. [0, 4095] 0.6

When you attach an L2VlanNetwork to a cluster, note that ZStack Cloud will create a VLAN device on the host in the cluster. To make this operation take effect, make sure that the switch port to which the Ethernet device specified by physicalInterface connects has a VALN tag.

As shown in Configuration of L2VlanNetwork.

Figure 6. Configuration of L2VlanNetwork


In the figure above, both Port 5 and Port 12 of L2 Switch are tagged with VLAN 10. You can use physicalInterface = eth0 and vlan = 10 to create an L2VlanNetwork, and attach it to Cluster.

L2VlanNetwork KVM Specifications

When you attach L2VlanNetwork to a KVM cluster, note that ZStack Cloud will create a VLAN device and a bridge on all hosts in a cluster. The pseudo codes are as follows:
Assuming physicalInterface = eth0, vlan = 10

vconfig add eth0 10
brctl create br_eth0_10
brctl addif br_eth0_10 eth0.10
L2VlanNetwork Inventory Sample
{
    "inventories": [        
        {
            "attachedClusterUuids": [],
            "createDate": "Oct 30, 2017 1:41:19 PM",
            "description": "",
            "lastOpDate": "Oct 30, 2017 1:41:19 PM",
            "name": "L2Vlan",
            "physicalInterface": "eth0",
            "type": "L2VlanNetwork",
            "uuid": "ae97ba4adcb7404690344dde407b429c",
            "vlan": 2222,
            "zoneUuid": "e59b71e99d8a4ea1952b578388b8cd1d"
        }
    ],
    "success": true
}

SDN Controller Inventory

Name Description Optional Valid Value Starting Version
uuid The UUID. For more information, see Resource Property. 3.7.0
name The name. For more information, see Resource Property. 3.7.0
description The description. For more information, see Resource Property. Yes 3.7.0
ip 3.7.0
password The password. 3.7.0
username 3.7.0
vendorType 3.7.0
vniRanges 3.7.0
vxlanPools 3.7.0
groupBy Groups rows into subgroups based on values of columns or expressions. This field is equivalent to the Group By clause in MySQL, such as groupBy=type. Yes 3.7.0
createDate The creation date. For more information, see Resource Property. 3.7.0
lastOpDate The last operation date. For more information, see Resource Property. 3.7.0
userTags The user tags. The For more information, see CreateUserTag. Yes 3.7.0
systemTags The system tags. For more information, see CreateSystemTag. Yes 3.7.0
Sample
{
    "inventories": [
        {
            "createDate": "Oct 23, 2019 3:17:40 PM",
            "ip": "172.20.12.165",
            "lastOpDate": "Oct 23, 2019 3:17:40 PM",
            "name": "gtt",
            "password": "Password",
            "username": "shixin",
            "uuid": "5ce966372dde4169865474b88973a9d8",
            "vendorType": "H3C VCFC",
            "vniRanges": [
                {
                    "endVni": 3000,
                    "startVni": 3000
                },
                {
                    "endVni": 2009,
                    "startVni": 10
                }
            ],
            "vxlanPools": [
                {
                    "attachedCidrs": {},
                    "attachedClusterUuids": [
                        "f34570997a594344ad698280305a1a9a"
                    ],
                    "attachedVniRanges": [
                        {
                            "createDate": "Oct 23, 2019 3:17:52 PM",
                            "endVni": 29,
                            "l2NetworkUuid": "0b03b34eb79b46d99d2c0aa074bc2385",
                            "lastOpDate": "Oct 23, 2019 3:17:52 PM",
                            "name": "gtt",
                            "startVni": 23,
                            "uuid": "3691fb6e4d194eb39d9c49dc3c780816"
                        }
                    ],
                    "attachedVtepRefs": [],
                    "attachedVxlanNetworkRefs": [],
                    "createDate": "Oct 23, 2019 3:17:52 PM",
                    "description": "",
                    "lastOpDate": "Oct 23, 2019 3:17:52 PM",
                    "name": "gtt",
                    "physicalInterface": "eth0",
                    "sdnControllerUuid": "5ce966372dde4169865474b88973a9d8",
                    "type": "hardware-vxlan-pool",
                    "uuid": "0b03b34eb79b46d99d2c0aa074bc2385",
                    "zoneUuid": "182bd537a902404a94f6412d285d277e"
                }
            ]
        }
    ],
    "success": true
}


Download

Already filled the basic info? Click here.

Enter at least 2 characters.
Invalid mobile number.
Enter at least 4 characters.
Invalid email address.
Wrong code. Try again. Send Code Resend Code (60s)

An email with a verification code will be sent to you. Make sure the address you provided is valid and correct.

Download

Not filled the basic info yet? Click here.

Invalid email address or mobile number.

Email Us

contact@zstack.io
ZStack certification training consulting
Enter at least 2 characters.
Invalid mobile number.
Enter at least 4 characters.
Invalid email address.
Wrong code. Try again. Send Code Resend Code (60s)

Email Us

contact@zstack.io

The download link is sent to your email address.

If you don't see it, check your spam folder, subscription folder, or AD folder. After receiving the email, click the URL to download the documentation.

The download link is sent to your email address.

If you don't see it, check your spam folder, subscription folder, or AD folder.
Or click on the URL below. (For Internet Explorer, right-click the URL and save it.)

Thank you for using ZStack products and services.

Submit successfully.

We'll connect soon.

Thank you for choosing ZStack products and services.

Back to Top