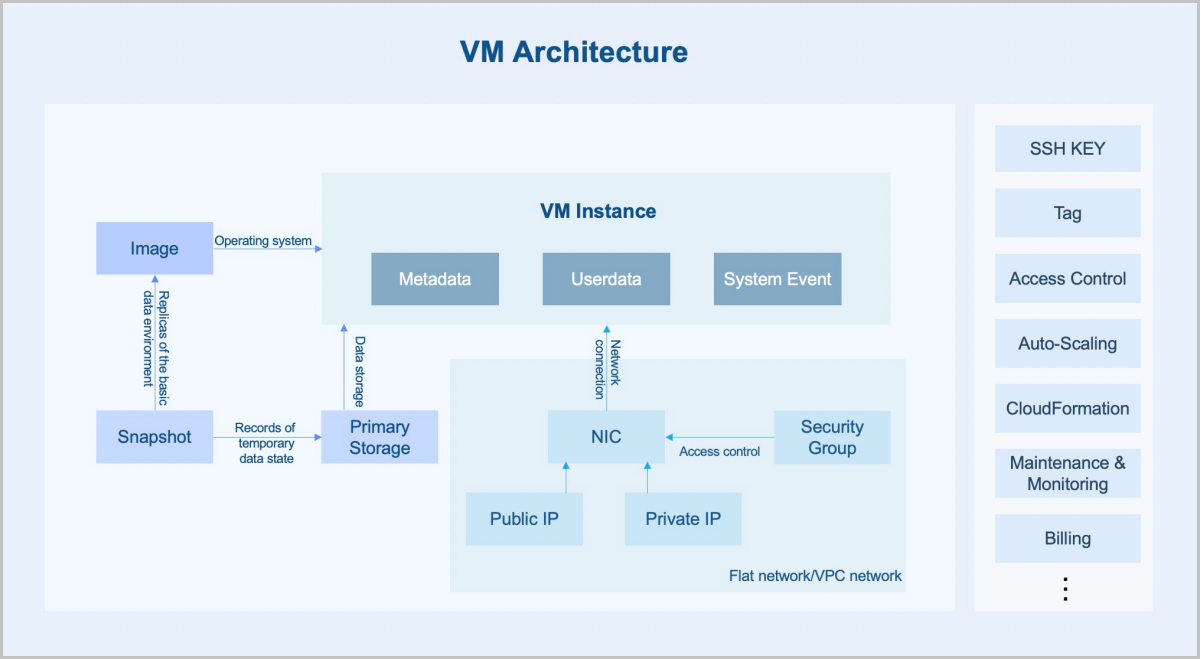
A VM instance is a virtual machine instance running on a host. A VM instance has its own IP address and can access public networks and run application services.
VM instances integrate the business of an enterprise on the cloud and migrate the information service system from traditional physical servers to VM instances. This helps to improve the resource utilization and reduce repeated investments. VM instances realize the rationalized scheduling of resources through intelligent load balancing services. In addition, the VM HA feature can deal with various exceptions to ensure business continuity of VM instances..
For modern IT enterprises, the deployment and approval of a development and testing environment is time-consuming, which severely restricts the business launch cycle. With VM instances, resources can be allocated online, which helps to establish or recover a development and testing environment in seconds. This accelerates the business launch. In the same resource pool, an enterprise can develop its environment by using the encapsulated environment of a VM instance and arrange the testing plan more reasonably. After an application development is completed, resources occupied by the corresponding VM instance can be quickly released and assigned to other projects. You can plan resource configuration in advance and apply for immediate distribution as needed.
For enterprises that cannot migrate PaaS or SaaS services to the public cloud, they can use ZStack Cloud to build a private cloud environment and deploy the PaaS or SaaS services on VM instances. The flexibility, stability, and high concurrency characteristics of the VM instances help to ensure the security, stability, and high-efficiency of the enterprises.
In recent years, network attack defense is tilted towards attackers. Enterprises are facing severe cloud security challenges as various high-risk vulnerabilities, APT targeted attacks, and computer viruses emerged in an endless stream. By using VM instances, enterprises can build a completely isolated security rehearsal environment and ensure the business security with monitoring and alarming, log auditing, vulnerability management, anti-virus and other means.
3D rendering is commonly used in movie production or three-dimensional video games. Due to the extremely high computational intensity, GPU server clusters are often used to provide computing abilities. ZStack Cloud provides GPU passthrough features, which enables extremely low performance loss (within 5%) as well as centralized and efficient cluster management. Coupled with intelligent monitoring and billing, VM instances can form a complete set of convenient and efficient rendering farm solution.
Enterprises can build a TensorFlow-based AI application by using VM instances with GPU passthrough. The powerful computing capabilities of GPU devices can fully meet the infrastructure requirements for large-scale model training.
GPU devices play a critical role in the field of cloud desktop applications. GPU devices not only upgrade the desktop visual experience, but also assume the main computing role in special applications. Replacing traditional PC graphics stations, GPU devices allow users to implement their 3D work in a safer environment. By using VM instances with GPU passthrough and protocols such as RDP and PCoIP, users can fully enjoy the capabilities of graphics cards and obtain a near-physical machine experience.
 Note: When you create VM instances in bulk, the names of these VM instances will be followed by -1, -2, -3 and so forth to distinguish these VM instances.Note: If you select an Windows-based ISO image that has enabled Virtio, the Virtio drive is attached to the image by default. You need to manually install the drive when you install the operating system. If you restart the VM instance on the UI, the drive will be detached.Note: Note: If you select an Windows-based ISO image that has enabled Virtio, the Virtio drive is attached to the image by default. You need to manually install the drive when you install the operating system. If you restart the VM instance on the UI, the drive will be detached.Note: Note: To enable SR-IOV, note that:Note: To assign an IP address, note that:Note: To use user data, note that:
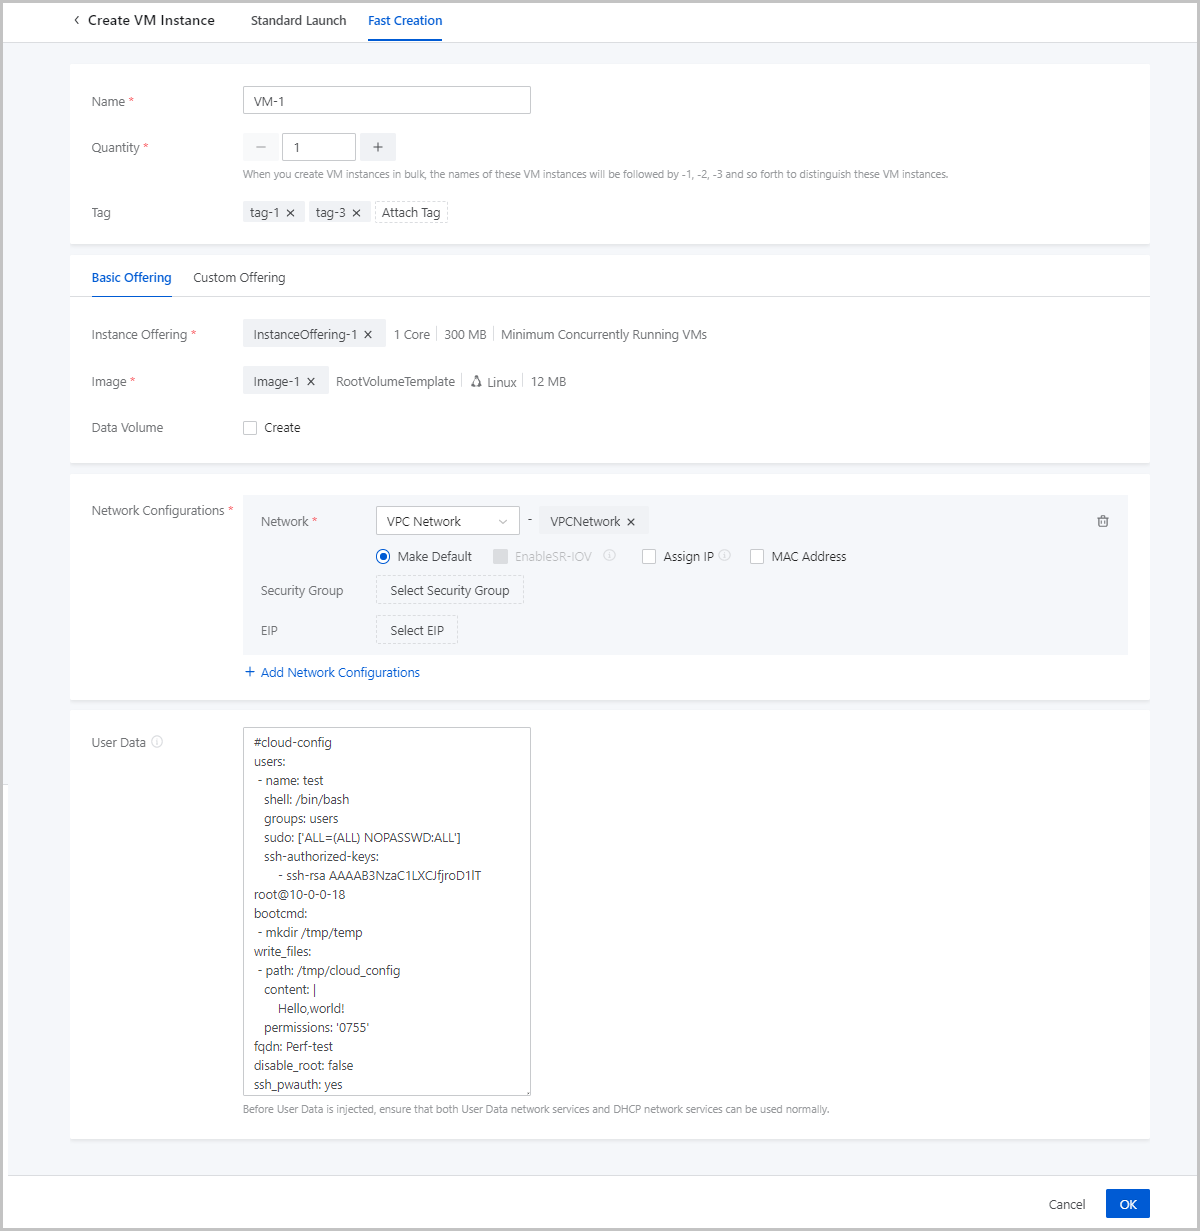
Email Us
contact@zstack.ioEmail Us
contact@zstack.ioThe download link is sent to your email address.
If you don't see it, check your spam folder, subscription folder, or AD folder. After receiving the email, click the URL to download the documentation.Thank you for using ZStack products and services.
Submit successfully.
We'll connect soon.Thank you for choosing ZStack products and services.

